| MongoDB Python Connection | 您所在的位置:网站首页 › how to query mongodb documents in python › MongoDB Python Connection |
MongoDB Python Connection
|
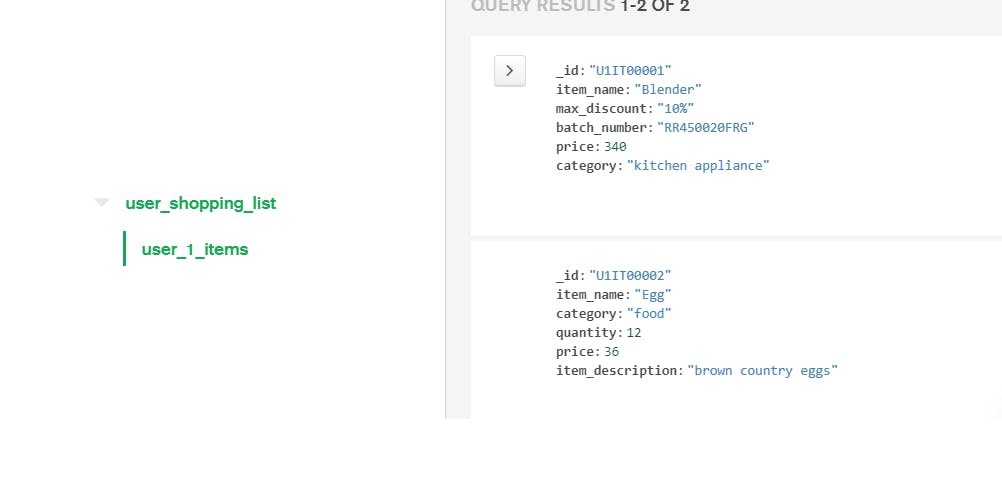
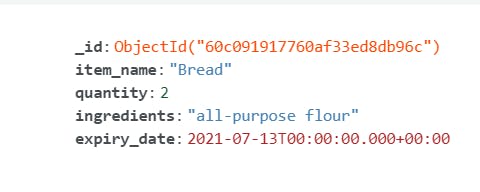
Connecting Python and MongoDB Atlas PyMongo has a set of packages for Python MongoDB interaction. To install PyMongo, open command line and type: python -m pip install pymongoTip: If you are getting “ModuleNotFoundError: No module named 'pymongo'” error, uninstall pymongo. Use pip uninstall pymongo command. Then, re-install using the installation command. For this python mongodb tutorial, we use mongodb srv URI, so let’s install dnspython: python -m pip install dnspythonNow, we can use pymongo as a python mongodb library in our code with an import statement. Creating a MongoDB database in PythonThe first step to connect python to Atlas is MongoDB cluster setup. Next, create a file named pymongo_test_insert.py in any folder to write pymongo code. You can use any simple text editor like Textpad/Notepad. Create the mongodb client by adding the following: def get_database(): from pymongo import MongoClient import pymongo # Provide the mongodb atlas url to connect python to mongodb using pymongo CONNECTION_STRING = "mongodb+srv://:@.mongodb.net/myFirstDatabase" # Create a connection using MongoClient. You can import MongoClient or use pymongo.MongoClient from pymongo import MongoClient client = MongoClient(CONNECTION_STRING) # Create the database for our example (we will use the same database throughout the tutorial return client['user_shopping_list'] # This is added so that many files can reuse the function get_database() if __name__ == "__main__": # Get the database dbname = get_database()Use the connection_string to create the mongoclient and get the MongoDB database connection. Change the username, password and cluster name . In this python mongodb tutorial, we will create a shopping list and add a few items. For this, we created a database ‘user_shopping_list’. MongoDB doesn’t create a database until you have collections and documents in it. So, let’s create a collection next. Creating a collection in PythonTo create a collection, pass the collection name to the database. Make sure to have the right indentation while copying the code to your .py file. collection_name = dbname["user_1_items"]This creates a collection named user_1_items in the user_shopping_list database. Inserting documents in PythonFor inserting many documents at once, use the pymongo insert_many() method. item_1 = { "_id" : "U1IT00001", "item_name" : "Blender", "max_discount" : "10%", "batch_number" : "RR450020FRG", "price" : 340, "category" : "kitchen appliance" } item_2 = { "_id" : "U1IT00002", "item_name" : "Egg", "category" : "food", "quantity" : 12, "price" : 36, "item_description" : "brown country eggs" } collection_name.insert_many([item_1,item_2])Let us insert a third document without specifying the _id field. This time we add a field of data type ‘date’. To add date using pymongo, use the python dateutil package. ISODate will not work with Python, as it is a Mongo shell function. Install the package using the following command: python -m pip install python-dateutil Add the following to pymongo_test.py: from dateutil import parser expiry_date = '2021-07-13T00:00:00.000Z' expiry = parser.parse(expiry_date) item_3 = { "item_name" : "Bread", "quantity" : 2, "ingredients" : "all-purpose flour", "expiry_date" : expiry } collection_name.insert_one(item_3)We use the insert_one() method to insert a single document. Open the command line and navigate to the folder where you have saved pymongo_test_insert.py. Execute the file using the python pymongo_test_insert.py command. Let’s connect to MongoDB Atlas UI and check what we have so far. Login to your Atlas cluster and click on the collections button. On the left side, you can see the database and collection name that we created. If you click on the collection name, you can view the data as well:
The _id field is of ObjectId type by default. If we don’t specify the _id field, MongoDB generates the same. Not all fields present in one document are present in others. But MongoDB doesn’t stop you from entering data - this is the essence of a schemaless database. If we insert item_3 again, mongodb will insert a new document, with a new _id value. But, the first two inserts will throw an error because of the _id field, the unique identifier. Querying in PythonLet’s view all the documents together using find(). For that we will create a separate file pymongo_test_query.py: # Get the database using the method we defined in pymongo_test_insert file from pymongo_test_insert import get_database dbname = get_database() # Create a new collection collection_name = dbname["user_1_items"] item_details = collection_name.find() for item in item_details: # This does not give a very readable output print(item)Open the command line and navigate to the folder where you have saved pymongo_test_query.py. Execute the file using the python pymongo_test_query.py command. We get the list of dictionary object as the output:
We can view the data but the format is not all that great. So, let’s print the item names and their category: print(item['item_name'], item['category'])Although Mongodb gets the entire data, we get a python ‘KeyError’ on the third document.
To handle missing data errors in python, use pandas.DataFrames. DataFrames are 2D data structures used for data processing tasks. Pymongo find() method returns dictionary objects which can be converted into a dataframe in a single line of code. Install pandas library as: python -m pip install pandasReplace the for loop with the following code to handle KeyError in one step: from pandas import DataFrame # convert the dictionary objects to dataframe items_df = DataFrame(item_details) # see the magic print(items_df)And don’t forget to comment the print(item['item_name'], item['category']) The errors are replaced by NaN and NaT for the missing values.
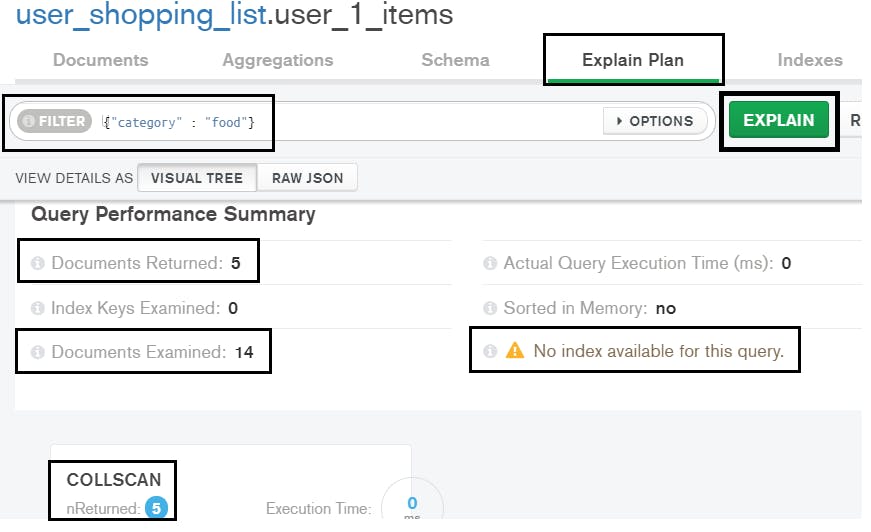
The number of documents and collections in a real-world database always keep increasing. It can take a very long time to search for specific documents -- for example, documents that have “all-purpose flour” among their ingredients -- in a very large collection. Indexes make database search faster, efficient, and reduce the cost of querying. For example, sort, count, match etc. MongoDB defines indexes at the collection level. For the index to make more sense, add more documents to our collection. Insert many documents at once using the insert_many() method. For sample documents, copy the code from github and execute python pymongo_test_insert_more_items.py in your terminal. Let’s say we want the items that belong to the category ‘food’: item_details = collection_name.find({"category" : "food"})To execute the above query, mongodb has to scan all the documents. To verify this, download Compass. Connect to your cluster using the connection string. Open the collection and go to the Explain Plan tab. In ‘filter’, give the above criteria and view the results:
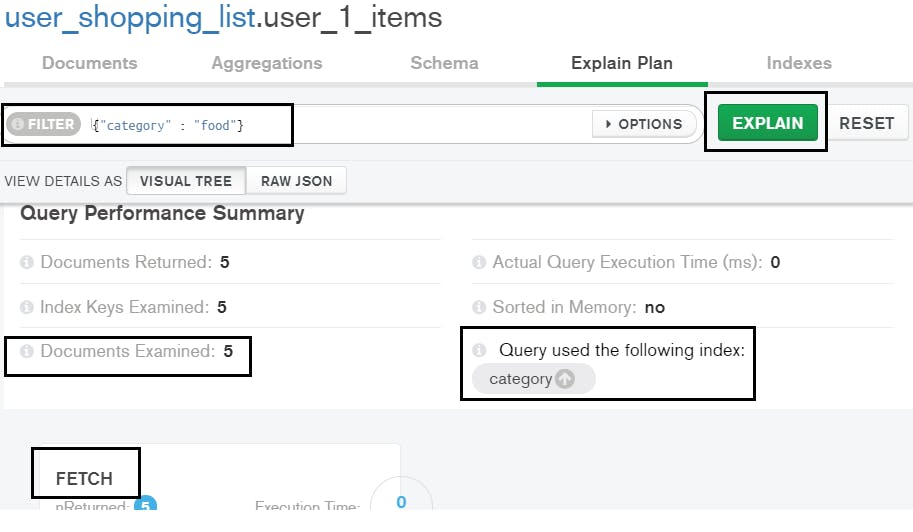
Note that the query scans twelve documents to get three results. Let us create a single index on the ‘category’ field. category_index = collection_name.create_index("category")Explain the same filter again on Compass UI:
This time only three documents are scanned because of the category index. We don’t see a significant difference in execution time because of fewer documents. But we see a huge reduction in the number of documents scanned for the query. Indexes help in performance optimization for aggregations as well. Aggregations are out of scope for this tutorial, but here’s an overview. |


【本文地址】
| 今日新闻 |
| 推荐新闻 |
| 专题文章 |